This week marks the start of a course I am attending called ‘Advanced Windows Security Course for 2017‘ run by Paula Januszkiewicz from CQURE. I am looking forward to seeing this course progress and discover various tips and tricks to break into operating systems and how to prevent those vulnerabilities
CQURE was formed in 2008 in Poland and since then has expanded to the rest of Europe, the Americas, Middle East and Asia – as well as opening offices in New York and in Dubai. Their services range from IT security audits, to penetration tests, solution implementations and customized trainings. They share their expertise both offline (at seminars and conferences) and online (through videos and blog posts).
Paula Januszkiewicz (or Paula J for short) is the founder and CEO of CQURE. Paula has extensive experience in security projects and has conducted hundreds of security analyses (even for government organizations). Within CQURE she devoted herself to her passions: Penetration Tests, Audits, Architecture Consulting and creating Trainings & Seminars. Paula delivers training on all things related to security and is a top speaker at many well-known conferences like Microsoft Ignite where I first listened to Paula speak.
Week 1 – commencing 28th Nov
Week 2 – commencing 5th Dec
Week 3 – commencing 12th Dec
Week 4 – commencing 19th Dec
Week 5 – commencing 10th Jan
Week 6 – commencing 17th Jan
This is module 1 and it was billed as an ‘introduction session’… Tell you what I was very glad that I had listened to CQURE’s excellent webinars over the past couple of weeks, since it covered a lot of similar content, but at the end of module 1 my brain was well and truly fried and sometimes struggling to keep up with Paula as she whizzed from topic to topic.
logman query providers
Sysmon is a tool written by Sysinternals and CQURE run it on every machine with some standard filters to remove some of the noise. It traces literally everything and you can write events to a file that you can then remotely monitor with the likes of SCOM to get real-time alerts. We’re going to cover this in more detail in a later module as well.
<Sysmon schemaversion="3.10">
  <HashAlgorithms>md5,sha256</HashAlgorithms>
  <EventFiltering>
    <NetworkConnect onmatch="exclude"/>
    <CreateRemoteThread onmatch="include">
      <TargetImage condition="image">explorer.exe</TargetImage>
      <TargetImage condition="image">lsass.exe</TargetImage>
      <TargetImage condition="image">services.exe</TargetImage>
      <TargetImage condition="image">svchost.exe</TargetImage>
      <TargetImage condition="image">winlogon.exe</TargetImage>
    </CreateRemoteThread>
    <RawAccessRead onmatch="exclude">
      <Image condition="image">C:\Windows\Sysmon.exe</Image>
      <Image condition="image">System</Image>
    </RawAccessRead>
  </EventFiltering>
</Sysmon>
psexec -i -s -d
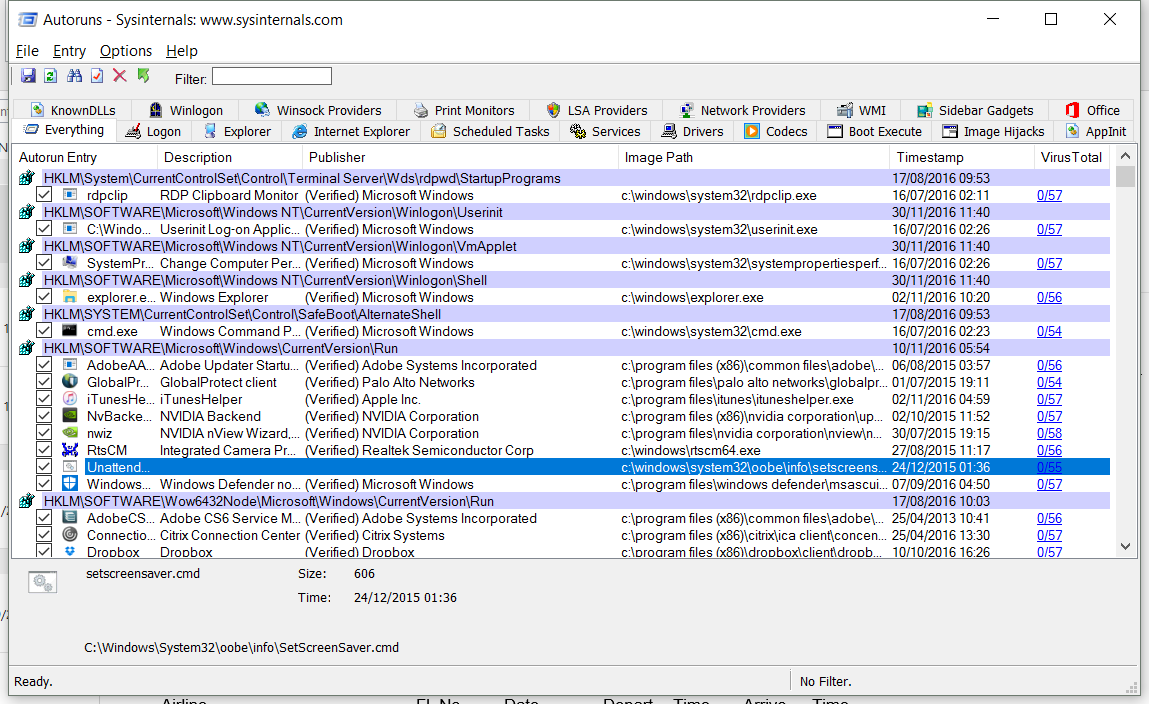
Autoruns is again another tool written by Sysinternals (seriously download the entire suite!) It shows you all the different places that software can and does hook into in order to start automatically. It can verify signatures and even compare the image files to an anti-malware site called VirusTotal
SDDL is the foundation for all things ACL related. The File System, Registry and Services are all controlled with SDDL. No I must warn you this language was no doubt written by someone with sadistic tendencies… Use sc sdshow for services and get-acl for files, folders and the registry.
C:\>sc sdshow VSS
D:(A;;CCLCSWRPWPDTLOCRRC;;;SY)(A;;CCDCLCSWRPWPDTLOCRSDRCWDWO;;;BA)(A;;CCLCSWLOCRRC;;;IU)(A;;CCLCSWLOCRRC;;;SU)

C:\>
PS C:\> get-acl c:\windows | select -expandproperty sddl
O:S-1-5-80-XXXXXXXXX-XXXXXXXXXX-1831038044-1853292631-2271478464G:S-1-5-80-XXXXXXXXX-XXXXXXXXXX-1831038044-1853292631-2271478464D:PAI(A;OICIIO;GA;;;CO)(A;OICIIO;GA;;;SY)(A;;0x1301bf;;;SY)(A;OICIIO;GA;;;BA)(A;;0x1301bf;;;BA)(A;OICIIO;GXGR;;;BU)(A;;0x1200a9;;;BU)(A;CIIO;GA;;;S-1-5-80-XXXXXXXXX-XXXXXXXXXX-1831038044-1853292631-2271478464)(A;;FA;;;S-1-5-80-956008885-XXXXXXXXXX-XXXXXXXXXX-1853292631-2271478464)(A;;0x1200a9;;;AC)(A;OICIIO;GXGR;;;AC)(A;;0x1200a9;;;S-1-15-2-2)(A;OICIIO;GXGR;;;S-1-15-2-2)
PS C:\>
As you can see, straight forward to read! Luckily online there are translation services, or you can go to MSDN and manually work out what each piece means.
You can add your own rights to that string and then apply them with sc sdset (services) or with set-ACL (files, folder, registry)
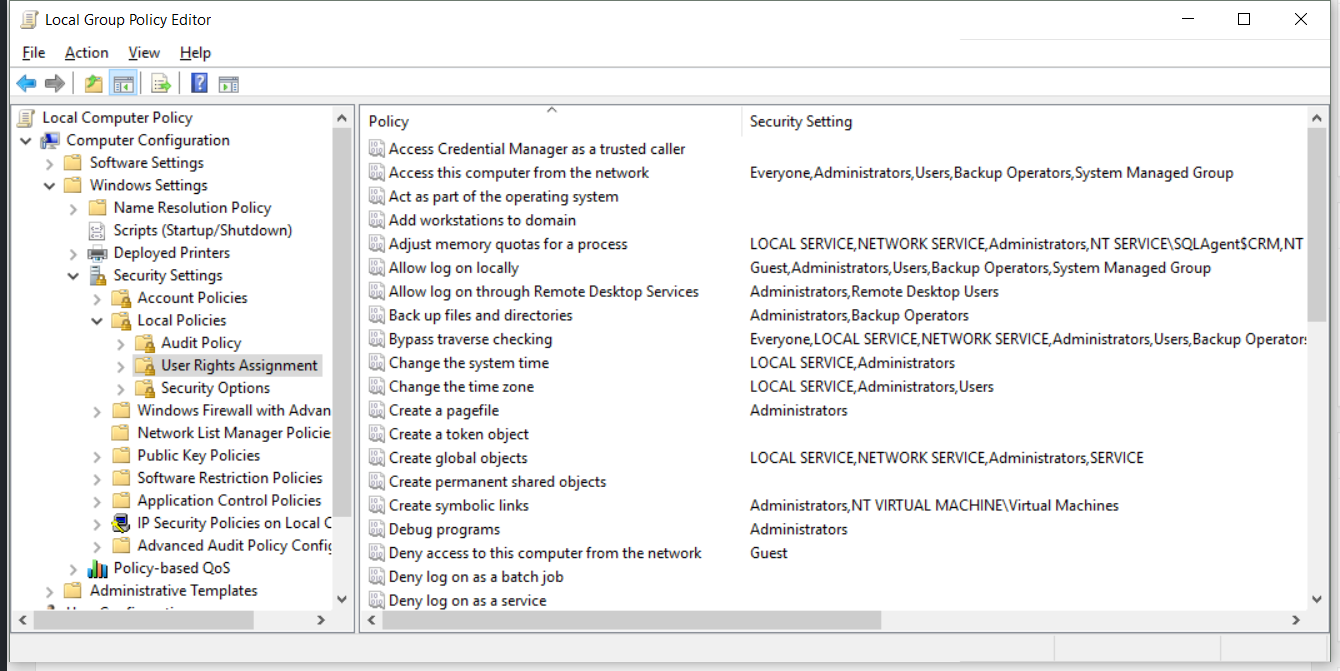
In Windows that are various user rights or privileges that can be managed with Group Policy or gpedit.msc for the local policy.
Allows reading of files and directories even if the user doesn’t have explicit rights. It is questionable whether Administrators should actually be able to do this, so consider removing this right.
Allows you to attach a debugger and gain access to all sorts of privileged data. Unless you are doing this regularly consider removing this right from Administrators.
Allows you to pretend to be any currently logged on user without any further authentication. Again consider removing this from Administrators.
Allows you to read the security log and manage settings for both. Generally you would want an Administrator to have this right.
Not really used so much any more, but this right is needed to install or upgrade Windows so probably best to leave it for Administrators.
Allows you to restore/overwrite any files even if you don’t have explicit rights. Consider whether an Administrator should need to do this.
Allows you to become the owner of any object, after which you would have full control on that object. Whilst it can be useful for a file server with home drives where users may have full control and accidentally or intentionally remove the Administrator’s rights, consider whether an Administrator should need to do this.
One other right deserves a mention which is Deny access this computer from the network. If you deny the Built-in Administrator account the right to access this computer from the network then you will thwart Pass the Hash attacks for this well known account. Of course it presumes that you’re not using the Administrator account for anything. So worth considering…
A normal user has integrity level Medium where as Internet Explorer with Enhanced Security has integrity level Low. Ok but what does this do… Every file and folder is assigned an integrity level and the OS won’t allow a lower level integrity user to effect a higher integrity level object. So while IE with enhanced security could write into your AppData\LocalLow folder, it couldn’t write into AppData\Local. Similarly as a standard user would be prompted before they could write into c:\Windows, since that is set to High integrity level and so needs elevation.
Instead of writing in those locations, Windows actually writes in %UserProfile%\AppData\Local\VirtualStore
For the registry this includes the most part of HKLM\Software which writes to HKCU\Software\Classes\VirtualStore. You can use reg flags HKLM\Software to check which keys can/can’t be virtualised.
Now the concern with both of these is that programs may trust the above locations thinking that they are well protected, however they could be fooled into reading data that another program as maliciously added in the above locations.
Module 2 focused on how credentials are attacked and how to prevent these attacks. First of all what are credentials? Credentials are proof of who you are which is verified by a trusted 3rd party.
Credentials and their MD4 hashes are stored in a variety of places. They are all indirectly encrypted with a bootkey, which is a machine specific key used to encrypt credentials. The bootkey is made up of various components including Data, GBG, Skew1 and JD. These are all stored in a ‘protected’ part of the registry HKLM\SYSTEM\CurrentControlSet\Control\Lsa.
Ok but it is protected so we should be alright, right?
As an administrator it is trivial to use something like psexec to elevate yourself to system level access which then grants you access. Also if you can get offline access (ShadowCopy, boot from USB, etc.) then you can access that part of the registry pretty easily too.
Right so now I have the bootkey components, now what do I do with them?
Once you have the bootkey then you can use tools to decrypt
Using a tool like mimikatz you can simply extract decrypted credentials from the above using the bootkey components. Trust me it literally takes seconds!
The above can be used for a variety of Pass-The-* attacks including Pass-The-Hash and Pass-The-Ticket
Preventing the above attack requires multiple enforcements. The following 10 items will go a long way towards hardening your environment against the above attack
VSM protects critical processes from the kernel. So even if the kernel is totally breached, with VSM Credentials and Virtual Machines could not be compromised. Without VSM a process running on the host could access privileged areas of any Virtual Machine, which would then allow access to things like credentials and hashes in the same way as the earlier attack pattern.
VSM is available in Windows Server 2016 and Windows 10 and requires processor virtualization extensions such as VT-X, VT-D. It is the way the modern operating system protects itself from Pass-The-Hash attacks.
Kerberos tickets are cached on the local machine, by default for 10 hours. However did you know that these tickets are cached system wide!? So when I log off and you log on, my Kerberos tickets are still stored in the system and if you’re a local administrator it is straight forward to grab my tickets and inject them into your credentials!
This is easy to prevent by adding a logoff script which runs
klist purge
These are not really credentials, they would be more accurately described as Cached Logon Data. They are stored in HKLM\SECURITY\Cache. These credentials used to be protected with an algorithm called DCC1 but this is subject to brute force and so in Windows Vista MSDCC2 was introduced to increase the strength of the encryption. More details about the algorithm can be seen here. Now you may think ‘no problem I can just set cached credentials to 0 and prevent access with cached credentials.
Unfortunately not… We can overwrite the cached credentials (or create a brand new entry) quite easily with offline access and mimikatz and it will allow us to log on to the machine as any domain account. We won’t get rights to any domain resources, nor anything protected with DSAPI though.
Chromepass can be used to view DSAPI protected saved credentials from websites and the likes including decrypted password. When we are logging on with cached credentials we cannot use DSAPI to decrypt data that was encrypted with a different password. So this protects critical data from this type of attack. More DSAPI data can be found in %APPDATA%\Roaming\Microsoft\Protect, these are called master key containers, each containing two keys. One key is encrypted with your password hash (SHA1 for local accounts, MD4 for domain accounts), the other key is encrypted with the public key of the domain (or local machine for standalone). For Active Directory the private key is held on each Domain Controller. With physical access to the Domain Controller it is possible to grab this private key and then use it to decrypt the DSAPI secrets on every single machine. Now the bad news is that the public/private key certificate is generated when you create the domain and it NEVER expires and cannot be revoked/reissued.
The mitigation for this is to use DSAPI-NG which uses SID protected pfx files for the encryption process. This is the default on Windows Server 2016 and Windows 10, or as a user you could use something like KeePass to store your passwords (but don’t use Windows Credentials for your KeePass credentials.
Smart Cards are certificates stored on a device (or in case of a Virtual Smart Card in your certificates container) and it allows you to logon with a pin off a security device. Creating a Virtual Smart Card is very easy by using the following command (NOTE that in production you would use something more secure)
tpmvscmgr create /name myVSC /pin default /Adminkey random /generate
Now the weakness is that you can use pkinitmustiness to create pre-authentication Kerberos ticket. This allows you to later on use these tickets to access Kerberos protected resources even though you no longer have the Virtual Smart Card! So the moral of the story is, just because you’ve taken away a Smart Card from a user does NOT mean that the user no longer has access to your environment! Always disable the user’s account, do NOT rely on having their Smart Card.